Articles in this topic
The restaurant views
For locations that seat guests at tables — the daily view with tables and times, and the Floor Dashboard with its timeline, list and quick Arrived button.
7 min read
If your booking calendar uses the Restaurant/Venue booking calendar strategy, Clava seats each booking at a real table. You then have two screens under Active Venues instead of the board: the daily view and the Floor Dashboard. Both show the same bookings; pick the one you like.
Which screen do I have?
Look at the menu on the left, under Active Venues:
- Two entries — your location and your location followed by Floor Dashboard — mean your calendar seats guests at tables. This article is for you.
- One entry that opens a board with five columns means your calendar counts seats per area. See The Booking Board.
The strategy is chosen in the booking calendar — see Booking strategy. Only an administrator can change it.
The daily view
Click your location's name. The page shows the day as a grid: your tables down the left (grouped by floor, each with its number of covers) and the time of day across the top in steps of 15 minutes.
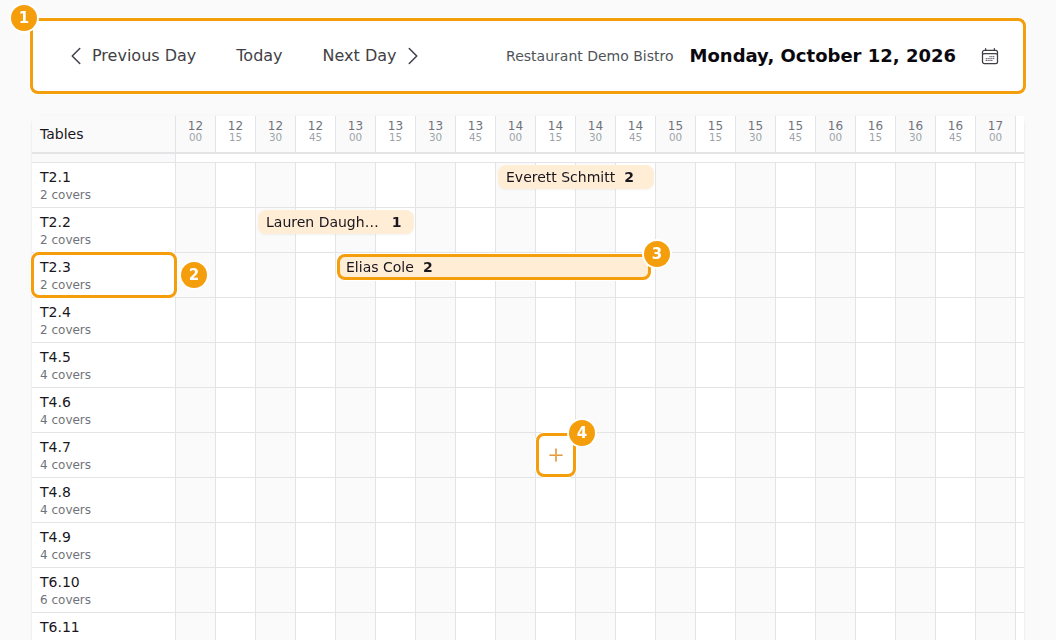
- Use Previous Day, Today and Next Day, or the calendar button, to go to another day (1).
- A booking is a bar in its table's row (3), as long as the booking lasts. It shows the guest's name and the number of guests, and a small green label if the guest entered a voucher.
- Times that are blocked in the booking calendar are tinted red; times outside your opening hours are shaded.
What you can do:
- Add a booking. Hold the pointer over an empty place in a table's row until a plus sign appears (4), and click it. The window New Booking for T4.7 at 10:30 opens. Fill it in and click Create Booking.
- Change a booking. Click its bar. The window Edit Booking opens. Change what you need and click Update Booking, or Delete to remove it at once.
- Move a booking. Drag its bar to another table or another time. If the table is taken then, Clava says so and leaves the booking where it was.
- Make it shorter or longer. Drag the left or right edge of the bar. A booking changes in steps of 15 minutes.
- Change the status. Open the booking and choose a status — Booked, Late, Canceled, No Show or Used.
Good to know
A canceled booking turns red but stays on the grid. Set Canceled only when the table should be free again.
The Floor Dashboard
Click the entry your location + Floor Dashboard. It is the same day in a faster, tidier screen, made for use during service.
The top bar
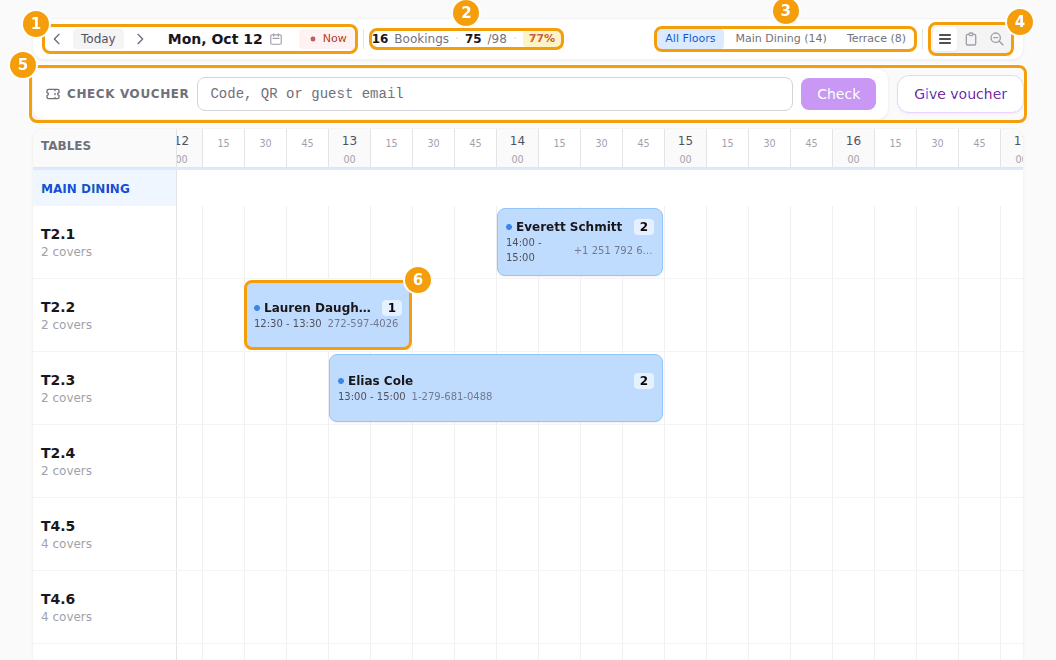
- (1) The arrows, Today and the date. Click the date to pick another day. On today a red Now button jumps to the current time.
- (2) The numbers of the day: the bookings, the guests against the number of seats, and the occupancy. Occupancy shows in green, amber from 70 percent and red from 90 percent.
- (3) All Floors and one button for every floor, with its number of tables.
- (4) Three buttons: Timeline, List and a magnifier that switches between the detailed and the overview timeline.
- (5) The Check voucher box and Give voucher, if your location accepts vouchers — see Booking Management at a glance.
The timeline. Tables in rows, time across. A booking is a coloured block (6): blue for booked, amber for late, green for arrived and red for canceled. Click an empty place in a table's row to add a booking at that time. Click a block to edit it. Drag a block to move it, and drag its edge to make it shorter or longer. A booking that takes several tables can't be moved here; open it and change its tables instead. In the overview timeline you can look and open bookings, but not add or move them.
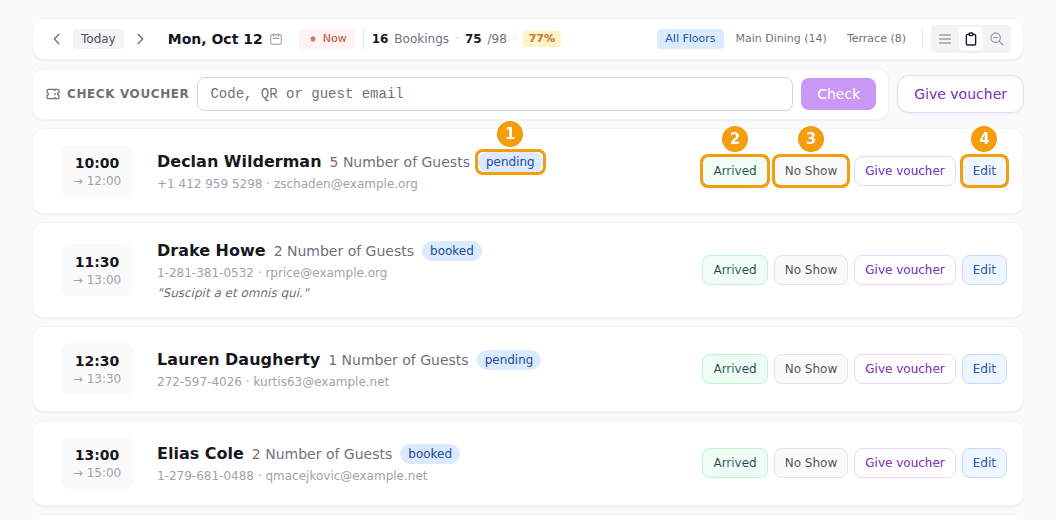
The list. Click List for one card per booking, in time order, with start and end time, the guest, the number of guests, status, contact details, the note, the voucher, allergens and diets. The buttons on each card are the quick way through a shift:
- Arrived marks the booking as Used. Use it when the guest sits down.
- No Show marks the booking as No Show and frees the table.
- Check voucher and Give voucher appear when the booking has a voucher or your location hands out vouchers.
- Edit opens the booking.
Tip
Arrived is also the visit that counts for automatic vouchers. Pressing it as guests sit down keeps your rewards right. See When a visit counts.
Add or change a booking in the window
Both screens use the same window. Fill in the guest's name, email and phone, the number of guests and the status; choose a special offer if the guest wants one; add a note and — if your calendar asks for them — tick allergens and dietary preferences. Click Create Booking or Update Booking. Like on the board, a booking you add here does not send the guest an email.