Articles in this topic
Floors and tables
Describe the rooms and tables where your guests sit, so Clava knows how many guests fit and which times it can offer when someone books online.
9 min read
Floors & Tables is where you tell Clava where your guests sit: the rooms or areas of your location and — if you book by table — the tables in them. Clava uses this to work out how many guests fit, and so which times it offers when a guest books online. A location with nothing described here has no times to offer.
Setup, floor and table
Everything here has three levels, one inside the other:
| Level | What it is | Example |
|---|---|---|
| Setup | A named arrangement of your location. It holds your floors. Most locations need only one. | "Main layout", "Summer layout" |
| Floor | A room or an area where guests sit. It doesn't have to be a storey. | Main hall, Terrace, Garden, Bar |
| Table | One table on a floor, with a name, a shape and a number of seats. | T1, T2, T3 |
The screen calls the seats of a table covers: a table with 4 covers seats 4 guests.
Good to know
In other languages the same three words are: Croatian Postava, Prostor and Stol; German Raumplan, Bereich and Tisch. If your team works in another language, the screen simply shows these words.
What Clava does with your floors and tables
When a guest picks a date and the number of guests on your booking page, Clava looks at the floors and tables of your default setup (see below) and offers only the times that still fit. A booking lasts 90 minutes, so a table or floor must be free for that whole time.
What counts depends on the type of your booking calendar. You choose the type in Booking Calendars, in the General tab, under Booking Strategy — see General settings.
| Booking Strategy | A time is offered when… | Numbers that matter |
|---|---|---|
| Restaurant/Venue booking calendar (booking by table) | a table with enough seats is free for the whole booking. | The Default Covers of each table. Floors only group the tables. |
| Capacity booking (booking by floor) | a floor ticked Bookable Online still has enough free seats. | The Seated Capacity and Bookable Online of each floor. Tables are not used. |
With capacity booking, a group must fit on one floor: Clava does not add the free seats of two floors together. The calendar's Table Size (see Booking rules) can also make a booking use more seats than guests — with a table size of 4, five guests use eight seats.
Guests never see the names of your tables. They see the names of your floors only if you let them choose where they sit or ask for a room for an event — see Names guests see and Event spaces. Otherwise they only see the free times. Your team sees everything: the booking board in Booking Management shows the floors and tables of your default setup.
Look at the screen
In Venue Setup, click Configure on your location, then click Floors & Tables. If you have not used Venue Setup before, read What Venue Setup is for first.
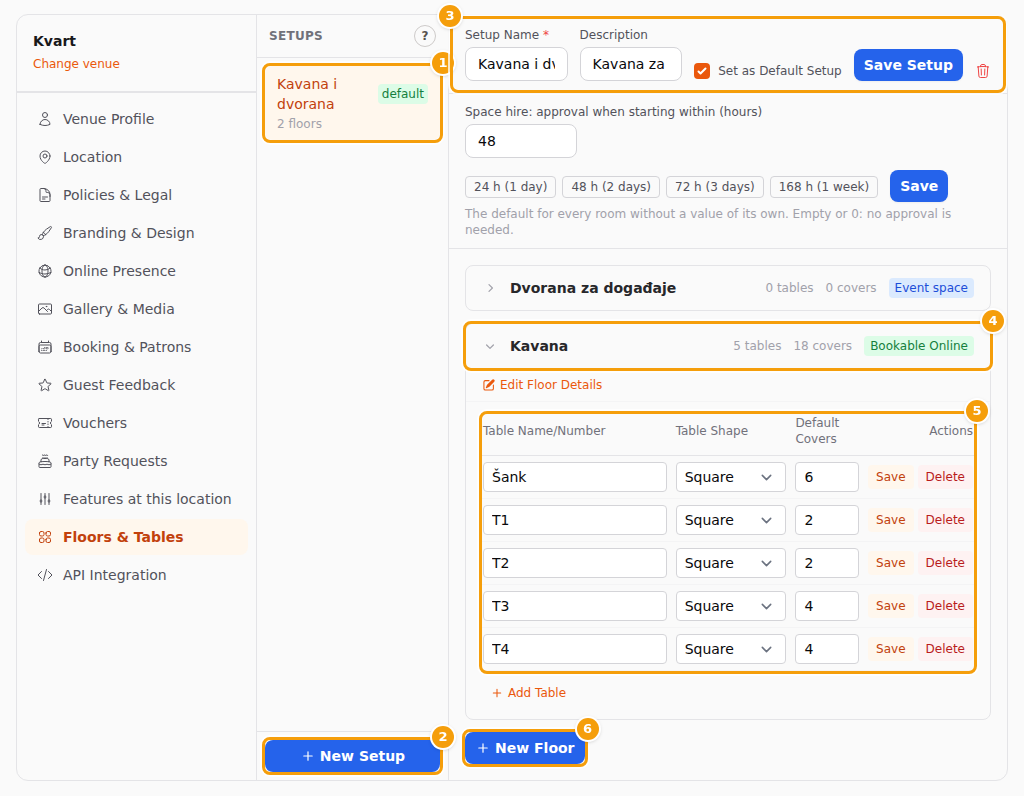
- (1) Setups lists your setups, from A to Z. Under each name you see how many floors it has. A green default label marks the default setup. Click a setup to open it.
- (2) New Setup adds a setup.
- (3) The bar at the top of an open setup holds its name, a short description, the default tick box, Save Setup and a small red trash can for deleting the setup.
- (4) Each floor is a bar with its name, the number of tables, the number of seats and — if the floor is ticked — a green Bookable Online label. Click the bar to open or close the floor. The first floor opens by itself when you open a setup.
- (5) The open floor shows its tables in a list: name, shape, seats and two buttons.
- (6) New Floor adds a floor to the open setup.
Good to know
This screen is a list, not a drawing: you can't place tables on a plan. (Party organisers have a separate drawing tool for the seating of private parties. It does not change which times guests can book.)
Important
The tab has no single Save button. Save Setup, Save Floor and each table's Save save only their own part. New Setup and New Floor act straight away, and so does deleting, once you confirm. See also Save your work.
Create a setup
Did you sign up with the set-up wizard? Then Clava may already have made a setup called Default Setup from your answers, with your floors and tables in it — or, for capacity booking, one floor called Main Area. Open it and check the numbers. A location that you added later with New Venue starts with a Default Setup and one floor, Main Area, for 50 guests — or, if you copied another location, with that location's setups, floors and tables. See Add a new venue.
-
Click Floors & Tables. A location without setups shows No setups yet (1). Click New Setup (2).
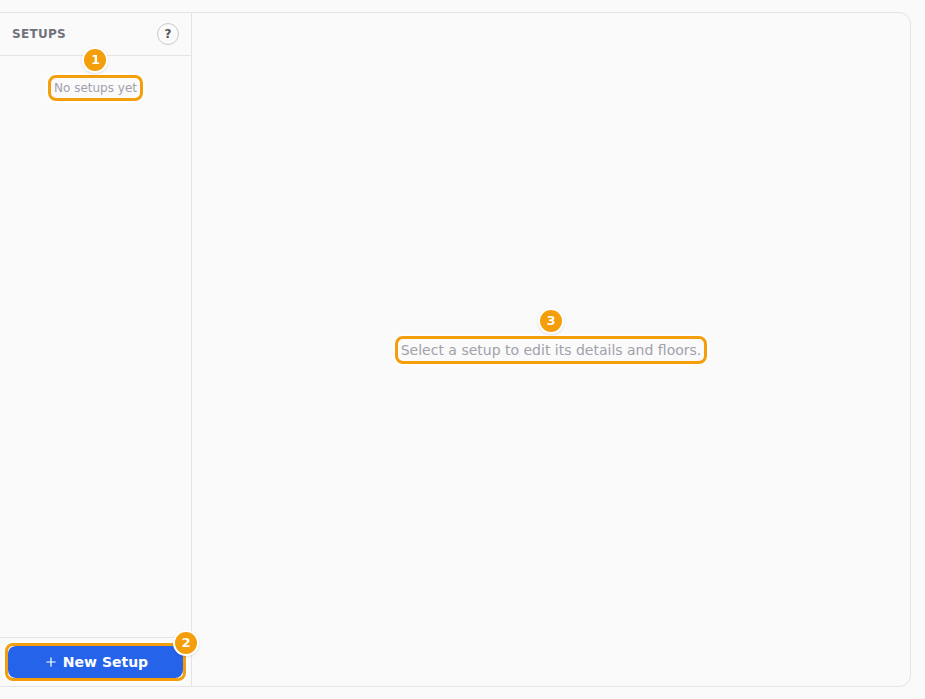
A location without setups: the empty list (1), New Setup (2) and the hint on the right (3) -
A setup called New Setup appears and opens at once. The first setup of a location is also marked as the default one.
-
In the bar at the top, type a name in Setup Name (1), for example Main layout. If you like, add a short note in Description (2). Names and descriptions can have up to 45 characters.
-
Leave Set as Default Setup (3) ticked if this is the setup guests should book into. Read more below.
-
Click Save Setup (4). A green message confirms it: Changes saved successfully.

The setup bar: Setup Name (1), Description (2), Set as Default Setup (3), Save Setup (4) and the trash can (5)
Careful
New Setup creates the setup the moment you click it — even if you never save. If you leave without renaming it, a setup called New Setup stays in your list. Rename it right away, or delete it with the trash can (5).
If Setup Name is empty, Save Setup does nothing — no message appears. Type a name first.
Add a floor
A floor is a room or an area: Main hall, Terrace, Garden. Even a small café needs at least one.
- Open your setup and click New Floor (6 in the picture above). A floor called New Floor is added to the list at once. The list is in alphabetical order, so the new floor may appear in the middle.
- Click the floor's bar to open it, then click Edit Floor Details.
- Fill in the details (see the table below).
- Click Save Floor (6). The same green message appears: Changes saved successfully.
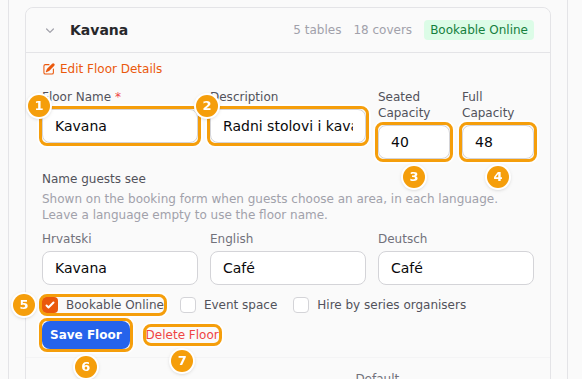
| Field | What to enter | What it does |
|---|---|---|
| Floor Name (1) | A short name, up to 45 characters. Required. | Your team sees it on the booking board. Guests see it only where you give them a name of their own — see below. |
| Description (2) | An optional note, up to 45 characters. | A note for yourself. It is shown nowhere else. |
| Seated Capacity (3) | How many guests can sit on this floor at the same time. | Capacity booking: the number of seats Clava can offer on this floor. Booking by table: it doesn't change the times guests see. In both cases it feeds the occupancy figure on your Booking Management dashboard, and your team sees it next to the floor name when they choose a floor for a party or event request. |
| Full Capacity (4) | How many people fit when everyone stands, for example at a party. | It doesn't change which times guests can book online. Treat it as a note for yourself. |
| Bookable Online (5) | Tick it to let guests book on this floor. New floors start unticked. | Capacity booking: guests only get times on floors that are ticked. Booking by table: no effect — leaving it ticked does no harm. |
Important
With capacity booking, a new floor can't be booked online until you tick Bookable Online and enter a Seated Capacity greater than zero. Without them, guests see no times.
If Floor Name is empty, Save Floor does nothing. Type a name first.
Names guests see
Edit Floor Details has one more field, below the ones in the table above: Name guests see, with a box for each language of your location. This is what guests read on the booking form when you let them choose where they sit — "Inside", "Terrace" — and in the list of rooms on the event request form. A box you leave empty falls back to the Floor Name. Up to 45 characters.
Event spaces
Tick Event space (next to Bookable Online) for the rooms you hire out, such as a banquet hall. Those floors are offered as the Preferred Space on the event request form, with their name and the number of guests they hold. The request keeps the guest's choice and shows it to your team, and the dialog Approve & Book has that floor chosen already. With no event space ticked, the form has no such field.
Add tables
Tables matter when your booking calendar books by table. With capacity booking you can leave the tables empty.
- Click the bar of the floor to open it.
- Click Add Table (1). An empty row appears at the end of the list. It is not saved yet.
- Type a name in Table Name/Number (2), for example T7.
- Choose a Table Shape (3): Square or Round.
- Enter the number of seats in Default Covers (4). A new row starts with 2.
- Click Save (5) at the end of that row. The green message Changes saved successfully. appears, and the floor's bar shows the new number of tables and seats.
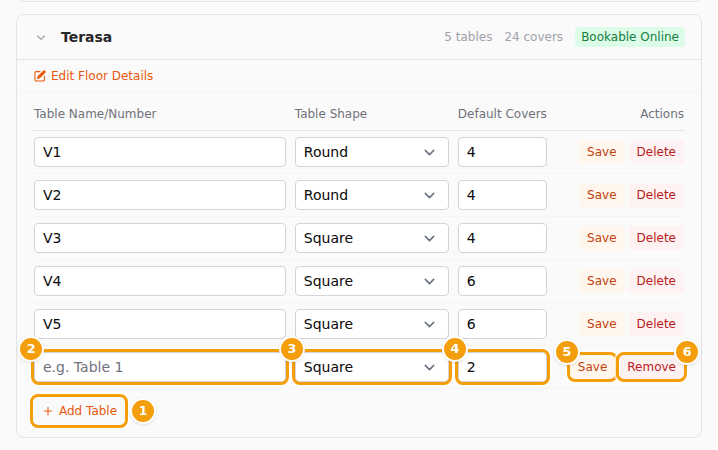
To change a table, edit its row and click that row's Save. To add several tables, repeat the steps — every row has its own Save.
Good to know about tables:
- The seats decide where a booking goes. Clava gives a booking for four guests the smallest free table with at least four seats. A table with six seats can still take two guests.
- The shape doesn't change bookings. It only decides whether a table is drawn round or square when your tables are copied into a party seating plan.
- Save each row before you leave. A row you have not saved is only on your screen. If you close the floor, open another setup, change the location or reload the page, it is gone. Remove (6) throws away a row you have not saved yet — nothing else happens.
- If Save does nothing, check that the name is filled in and that the seats are at least 1. Table names can have up to 45 characters.
Which setup counts
Only one setup can be the default, and it is the one that counts:
- Guests: the times offered online come from your default setup. If no setup is marked as the default, Clava uses the one you created first.
- Your team: the booking board in Booking Management shows the floors and tables of your default setup. Without a default setup, it can come up empty.
To make another setup the default, open it, tick Set as Default Setup and click Save Setup. All other setups of the location lose the label automatically.
Do you want another arrangement for the summer? Create a second setup, for example Summer layout, and give it its own floors and tables. When the season starts, make it the default. The first one keeps all its floors and tables.
Tip
Keep it simple: one setup, marked as the default, is right for most restaurants and cafés.
Delete a table, a floor or a setup
Deleting is permanent. There is no recycle bin and no undo.
A table
- Open the floor and click Delete at the end of the table's row.
- Clava asks Delete this table? Click Delete. A green message confirms it: Table deleted.
A table that has ever had a booking can't be deleted — not even if the booking is old or was cancelled. A red message says This table has bookings, so it cannot be deleted. and the table stays. There is no "hide" switch; you can rename the table or change its seats instead.
A floor
- Open the floor and click Edit Floor Details, then Delete Floor (7 in the picture of Edit Floor Details).
- Clava asks Delete this floor and all its tables? Click Delete Floor (3) to go on or Cancel (2) to keep it.
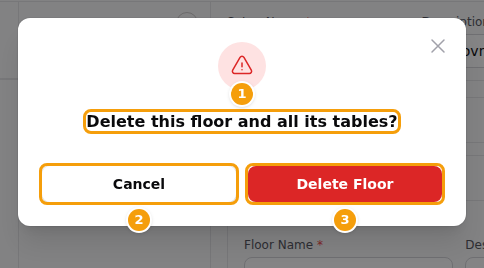
The floor and all its tables are gone for good. A green message confirms it: Floor deleted.
A setup
- Open the setup and click the small red trash can (5 in the picture of the setup bar).
- Clava asks Delete this setup? and says that the setup and all its floors and tables will be deleted for good. Click Delete. A green message confirms it: Setup deleted.
Careful
Clava does not check bookings before it deletes a floor or a setup. Do not delete a floor or a setup that has upcoming bookings. Tables that have had a booking can't be deleted, so Clava then stops with a general error message instead of a clear explanation — and part of a setup may already be gone by then.
Delete the only setup of a location, or the default one, and the booking board of your team can come up empty. A location without any setup shows guests no times at all. Mark another setup as the default straight away.
If guests see no available times
If the booking page says Sorry, there are no available slots for the selected date and party size., check these things in order:
- The location has a setup with at least one floor, and one setup is marked as the default.
- Booking by table: the default setup has a table with at least as many seats as the party, and it is free for the whole 90 minutes. A table with two seats is never offered to three guests.
- Capacity booking: a floor in the default setup is ticked Bookable Online, has a Seated Capacity greater than zero and still has enough free seats. Don't forget that a group must fit on a single floor.
- Nothing else has taken the space: a private party or an event booked at that time uses up seats on its floor (capacity booking) or the tables it was given (booking by table) for as long as it lasts, so fewer times are left, or none.
- The calendar is right: your location is linked to a booking calendar, Online Booking is switched on and you are open that day. See Bookings and guests and General settings. The whole checklist is in What a booking calendar does.
Hiring a room to a series organiser
If you run event series with an organiser, you can let that organiser book one of your rooms for their meetups. This is not the same as Event space (see Event spaces): Event space only offers the room as the Preferred Space on the event request form, while hiring lets a series organiser book it themselves, at a price.
- Open the floor with Edit Floor Details and tick Hire by series organisers. The room needs seats, or at least one table; a room that holds nobody cannot be hired.
- A panel Hiring this room opens. Enter the Default hourly rate. It is in the currency of this location. A room with no rate is hired at price on request: the organiser can still book it, but the estimate shows no total.
- Under Rate bands click Add a rate band for other prices. A band has a Name, the Days, a start (From), an end (To) and a price Per hour. Leave the days empty for every day and the times empty for the whole day; an end of 00:00 means midnight. A band wins over the default rate; if bands overlap, the narrower one is used, then the one higher in the list.
- Set Approval when starting within (hours) if a short-notice request should wait for you. Type the hours or use a preset (1 day, 2 days, 3 days, 1 week). Empty uses the default of the location, 0 never asks for approval.
- Save the floor.
The default for the whole location sits above the floors, in the field Space hire: approval when starting within (hours), with its own Save button. Empty or 0 means no request needs approval.
The panels only appear on locations where event series are switched on (see Switch events and series off). Then choose which rooms each series may book in the series' own settings. How a request is priced, confirmed or approved is in Hiring rooms to a series organiser, and the rates and approval hours in detail in Mark the rooms and their prices.
Tips
- Name tables so they sort well. Tables are listed in alphabetical order, letter by letter: Table 10 comes before Table 2. Use T01, T02 … T10 instead.
- Use short names. Your team reads them on the booking board.
- Tick Bookable Online anyway. On floors that guests can book it does no harm with booking by table, and you need it if you ever switch to capacity booking.
- Rename a New Setup or New Floor straight away. They are called "New Setup" and "New Floor" in the language you are using when you create them.
- The small ? next to Setups opens this article.