Articles in this topic
Status and dates
Switch a menu on or off, archive menus you no longer use, show a menu only between two dates, lock it against changes — and see exactly when guests can see it.
7 min read
A menu does not have to be on your website all year. You can switch it on and off with one click, give it a start and an end date for a seasonal menu, archive it when you have finished with it, and lock it so nobody changes it by accident. This article also lists when exactly guests can see a menu.
The three statuses
Every menu is Active, Inactive or Archived.
| Status | What it means |
|---|---|
| Active | The menu is on. Guests can see it wherever its Where it appears setting and its dates allow — see Where a menu appears. |
| Inactive | The menu is off. Guests do not see it on your website or on the event request form. It stays in your list, and your team can still add it to an event. |
| Archived | Put away. Guests do not see it, it is hidden from your list, and it is no longer offered when your team adds a menu to an event. Nothing is deleted. It does not count towards the menus of your plan. |
A new menu is Active. A copy of a menu starts Inactive — see Copy an existing menu.
Switch a menu on or off
There are three ways. They all do the same.
- In the list, click the round icon in the Status column (2 and 3 in the picture).
- In the editor, open More and click Deactivate or Activate.
- In the editor, click Edit, change Status and click Save Changes.
A green message says Menu activated. or Menu deactivated. The change counts at once.
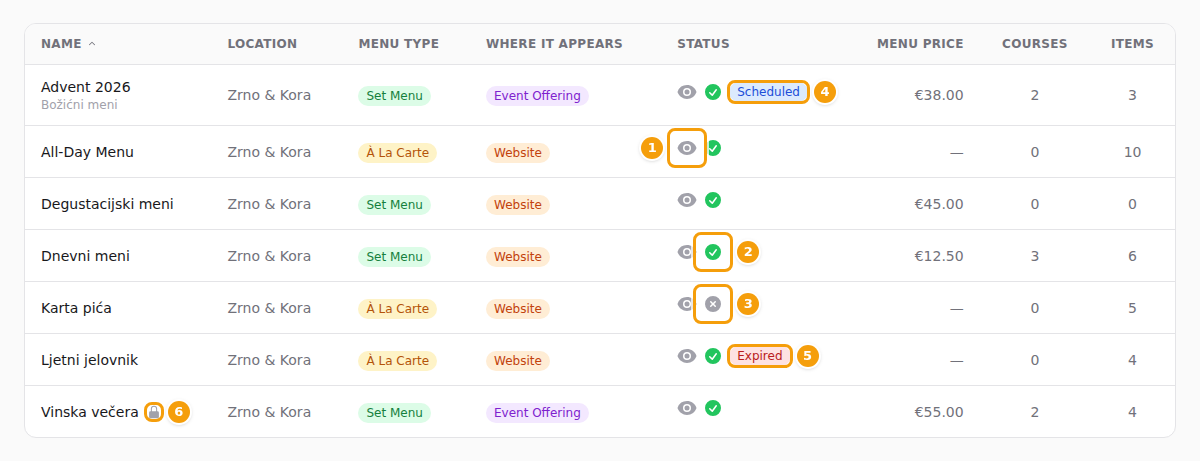
What you see in the Status column:
- (1) The eye opens the Preview of the menu.
- (2) A green tick: the menu is Active. Click it to switch the menu off.
- (3) A grey cross: the menu is Inactive. Click it to switch the menu on.
- (4) Scheduled: the menu is on, but its start date is still to come.
- (5) Expired: the menu is on, but its end date has passed.
- (6) A small lock next to the name: the menu is locked — see Lock a menu.
An Archived menu shows a small archive box instead of a button. On a phone, the cards show the status in words.
Archive a menu
Archive a menu you do not want any more but do not want to delete.
- Open the menu and click Edit.
- Change Status to Archived.
- Click Save Changes. Menu updated. confirms it.
The menu leaves the list. To see archived menus again, tick Show archived above the list, or choose Archived in the All Statuses filter.
An archived menu has no quick button. To bring it back, open it, click Edit, change Status to Active (or Inactive) and click Save Changes.
An archived menu does not count towards the menus of your plan, so archiving one frees a place. Bringing it back counts it again: if your plan is at its limit, Save Changes shows You have reached the limit for this feature on your current plan. and the menu stays archived — see Menus and your plan.
Show a menu only between two dates
A Christmas menu should appear on 1 December and vanish after 31 December. Give it dates and you do not have to remember.
- Open the menu and click Edit.
- Click Available from and pick the first day on the calendar. Do the same for Available until.
- Click Save Changes.
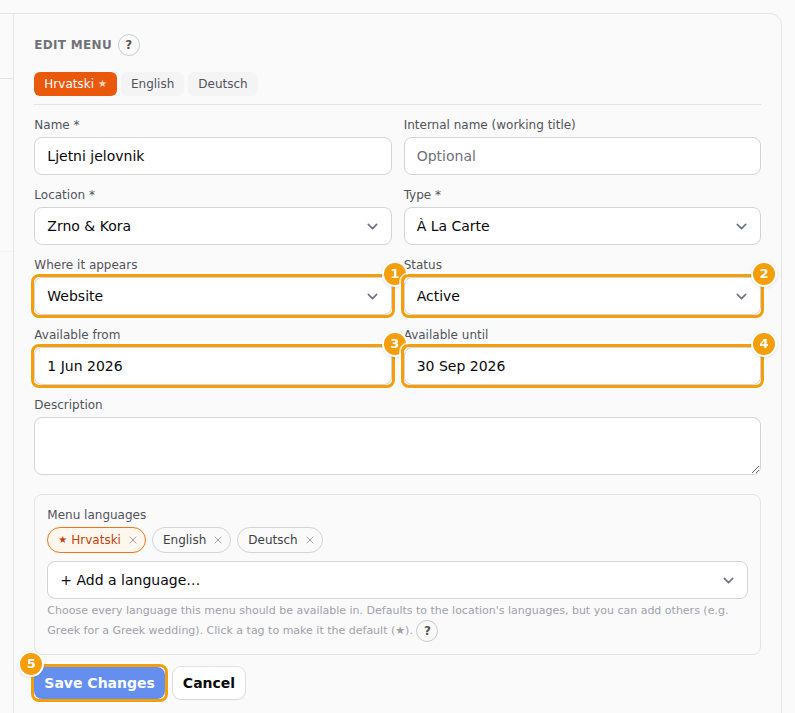
- You can fill in one date or both. An empty date means no limit on that side.
- Both days count: a menu available until 31 December is still there on 31 December.
- The dates are shown in the language you use Clava in — for example 5 Oct 2026 in English, 5. 10. 2026. in Croatian and 05.10.2026 in German.
- The end date must not be before the start date. Otherwise Clava says The "available until" date must be on or after the "available from" date. and saves nothing.
- Dates only matter for an Active menu. Before the start date the list shows Scheduled; after the end date it shows Expired. An Inactive or Archived menu stays off whatever the dates say.
- On your website a menu with dates shows a line such as Available from … to … above it.
Where a menu appears
If a menu does not show up where you expect it, go through this list.
On your website, in the Menu section, a menu appears only if all of these are true:
- It belongs to the location of that website.
- Its Where it appears is Website (see Where will the menu appear?).
- Its Status is Active.
- Today is inside its dates (or it has none).
- If the Menu section has menus ticked in its Select Menus list, this menu is one of them. With none ticked, all the menus that pass the other checks are shown. The list offers only menus whose Where it appears is Website.
- Your plan allows it: the Pro or Ultimate plan, or your free trial. On the Free plan the section says No menus available.
On the event request form, a menu appears only if menu selection is switched on in Venue Setup, the menu belongs to the location, its Where it appears is Event Offering, it is Active and today is inside its dates. If no menu qualifies, the drop-down is not shown. See Let guests pick a menu.
In an event, your team can add any menu of the location that is not archived and is inside its dates.
Lock a menu
Lock a menu that is finished and must not change — for example the menu you printed.
- Open the menu and click More, then Lock.
- A green message says Menu locked., a padlock appears next to the name, and a banner says This menu is locked and cannot be edited.
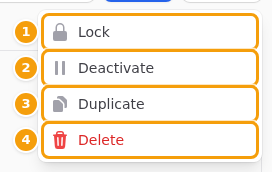
While a menu is locked you cannot change its details, its courses or its dishes, and you cannot delete it. The buttons for adding, moving and deleting are hidden, and saving is refused. You can still switch the menu on or off, preview it and copy it. A copy of a locked menu starts unlocked (and Inactive).
To change something, open More and click Unlock. Menu unlocked. confirms it.