Articles in this topic
Several locations
Run more than one restaurant? Switch between their websites, link them together, and copy your design to all of them at once.
5 min read
When your business has more than one location, every location has its own website — with its own pages, draft, version history and Publish button. The editor helps you keep them looking alike, and lets guests hop from one location to another.
Add a location
A new location is added as a new venue:
- In the menu on the left, click Venue Setup.
- Click New Venue (1), fill in the name and contact details, and click Create Venue. To start from a copy of one of your other locations, choose it under Start from first: its website then comes over as a draft. See Copy another venue.
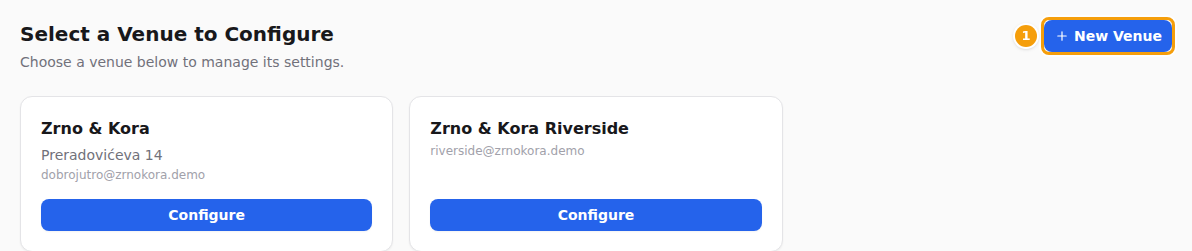
The first time you open the new location in the website editor, it gets its own website. Like every new website, it starts as a single page — its home page, with the booking form — and it is live right away. See Your website is online from day one.
Switch between locations
With more than one location, the name of the location you are editing appears at the top left of the editor (1). Click it and choose another location: the editor opens that location's website.

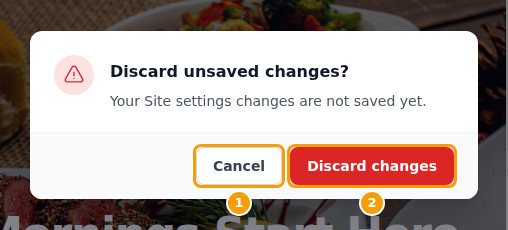
Changes in sections are saved automatically before you switch. If you changed something in the Site, Nav & Footer or Page tab without saving, the editor asks Discard unsaved changes? first:
- Cancel (1) — stay here, so you can save your changes first;
- Discard changes (2) — switch anyway; your unsaved changes are lost.
Link your locations on your website
Let guests find your other locations from the menu bar of your website.
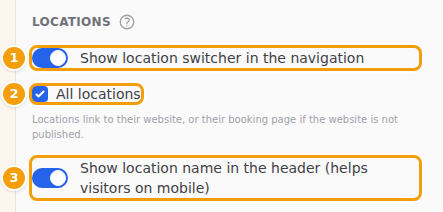
- Click the Site tab (the globe, the last icon) and scroll to Locations.
- Switch on Show location switcher in the navigation (1).
- Keep All locations (2) ticked, or untick it and choose the locations to show.
- Switch on Show location name in the header (3) — this shows which location a guest is looking at, which helps especially on phones.
- Click Save All Settings, then Publish.
On your website, guests now see the name of the location (1) and an Our locations menu (2) with all your locations (3):

Each location in the menu leads to its website — or, if that location's website is hidden, to its standard booking page. A location without any public page is left out (no public page — hidden).
Tip
Many pages, custom links or a long location name? The header never cuts a link off: what does not fit moves into a More menu, and when there is room for hardly any link (and on small screens) the whole menu becomes the burger menu.
A list of your locations on a page
Add a Locations section to a page, for example one called "Our locations", to show all your locations with their address and phone number and a Book a Table and a Visit button each.
- Locations to show — all your locations (leave some out), or pick them one by one and put them in your order.
- By default the locations are listed from A to Z by name. With locations in several cities, switch on Group by city: the locations of a city then stand together under a city heading. The city is read from the address, the town after the postcode, as in Ilica 62, 10000 Zagreb. The city of the location you are editing comes first, then the other cities from A to Z; with locations picked by hand, your order decides.
- If an address has no postcode and town, or all your locations are in one city, the list stays as it is.
Apply to all locations
Changed the colours or languages of one location, and want the others to match? Copy them in one go instead of doing it for every location.
-
Open the location that looks the way you want, and click the Site tab.
-
Make your changes and click Save All Settings first — only saved settings are copied.
-
Scroll to Keep all locations consistent and tick what to copy:
- Design (colors, fonts, theme, background) (1);
- Languages (2) — only the languages each location offers (see Languages);
- Location switcher & header name (3).
-
Click Apply to all locations (4).
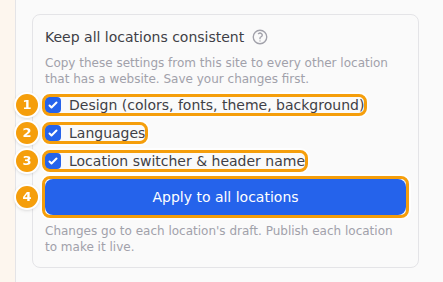
Choose what to copy (1–3) and click Apply to all locations (4) -
The editor confirms which locations were changed (1), and reminds you that Only their drafts changed. Publish each location to make it live. (2)
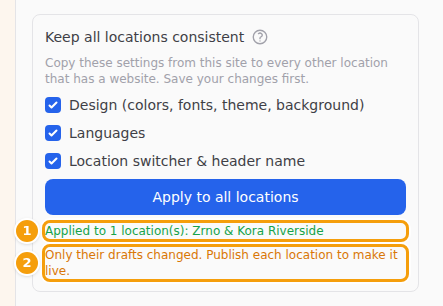
Applied to 1 location(s) (1) — only their drafts changed (2) -
Use the location switcher (1) to open each of the other locations, check the preview, and click Publish (2).

Another location with the copied design in its draft: switch to it (1) and publish (2)
Important
Apply to all locations changes the draft of each other location — not their live websites. Guests see the changes only after you publish each location.
Good to know
Only locations that already have a website are updated. Added a location but never opened it in the editor? Open it once, then apply again. Pages, sections, texts and photos are never copied — each location keeps its own.
Show another location's information
Some sections can show the information of another location: Menu, Gallery, Opening Hours, Reviews, Offers, Events, Event Programme, Event Details and Booking. Handy when two locations share a menu, for example.
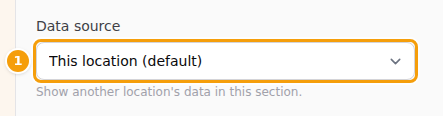
- Open the section in the Editor tab.
- Under Data source (1), choose the location whose information you want to show. This location (default) shows the location you are editing.
Tip
Want a page that lists all your locations, with their address and phone number? Add an Our Locations section. See Add a section.